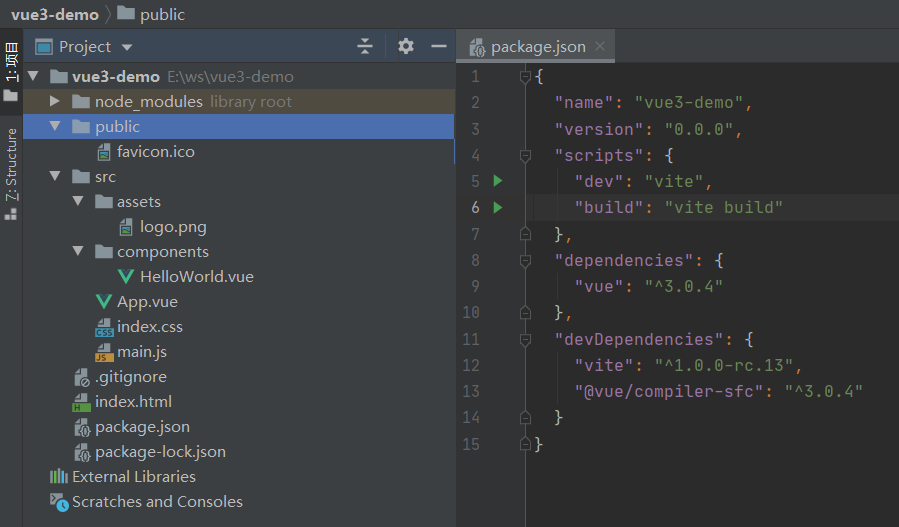
02-vue3项目搭建
主要记录一下vue3项目搭建
Vue3 后台管理系统模板列表:https://blog.csdn.net/weixin_44106553/article/details/136675172
创建vue3+vite项目
这里是利用vite脚手架来快速创建项目
安装vue-cli脚手架 (可忽略)
shell
npm install -g @vue/cli --force安装vite脚手架
shell
npm install -g create-vite-app创建 vue3 项目
shell
create-vite-app vue3-demo
整合ElementPlus
安装依赖
shell
# 选择一个你喜欢的包管理器

# NPM
$ npm install element-plus --save

# Yarn
$ yarn add element-plus

# pnpm
$ pnpm install element-plussrc\main.js
完整引入
js
// main.ts
import { createApp } from 'vue'
import ElementPlus from 'element-plus'
import 'element-plus/dist/index.css'
import App from './App.vue'

const app = createApp(App)

app.use(ElementPlus)
app.mount('#app')测试是否正常
vue
<template>
  <el-button type="primary" >Primary</el-button>
</template>

<script>

export default {
  name: 'App',
  components: {
  }
}
</script>不同的环境执行不同的配置文件
在 Vite 中,import.meta.env 是一个特殊的对象,包含了环境变量。
本地开发:import.meta.env.MODE = 'development'
生产环境:import.meta.env.MODE = 'production'
还有一种写法
process.env.NODE_ENV === 'production'
配置文件加载
vite项目启动默认会加载配置文件。本地启动默认取的是.env.development文件, .env是公共文件
- .env:公共环境
- .env.development:开发环境
- .env.production:生产环境
通过命令加载指定的配置文件
shell
"dev": "vite --mode development",text
# .env.development 文件中
# 没有以 `VITE_` 为前缀 不会暴露出去
USER_PASSWORD = foobar
# 可以暴露出去
VITE_APP_BASE_PATH = https://blog.share888.top/vue文件使用
vue
<script setup>
// 直接使用import.meta.env去读取环境变量文件里面的某个属性
console.log(import.meta.env);

//可以直接读取当前的环境。自带的默认属性
console.log(import.meta.env.MODE); //development
const VITE_APP_BASE_PATH = import.meta.env.VITE_APP_BASE_PATH;
</script>js文件加载
其他方式:https://blog.csdn.net/qq_39505245/article/details/134332060
我在用这种方式的时候,各种报错。很烦。
除了配置文件加载之外还可以通过js文件来实现不同的配置文件加载,更加的灵活。 vite.config.js
js
import { defineConfig } from "vite";
import vue from "@vitejs/plugin-vue";

export default defineConfig({
  plugins: [vue()],
});package.json
json
{
    "dependencies": {
      "vue": "^3.0.4"
    },
    "devDependencies": {
      "@vitejs/plugin-vue": "^5.0.4",
      "@vue/compiler-sfc": "^3.0.4",
      "vite": "^3.2.10"
    }
}配置@路径别名
对于使用 Vite 构建的 Vue 3 项目,你需要在项目根目录下 vite.config.js 文件中配置路径别名。
js
// vite.config.js
import path from 'path';

// vite.config.js
export default ({ command }) => {
    return {
        resolve: {
            alias: {
                '@': path.resolve(__dirname, 'src'),
            },
        },
    }
};服务端口代理配置
js
import fs from 'fs';
import path from 'path';
// https支持 读取本地证书
const cert = fs.readFileSync(path.resolve(__dirname, 'localhost.pem'));
const key = fs.readFileSync(path.resolve(__dirname, 'localhost-key.pem'));

// vite.config.js
export default ({ command,mode }) => {
    // 获取 Vite 定义的环境变量
    const isProduction = mode === 'production';
    return {
        server: {
            port: 3002, //项目端口
            host: '0.0.0.0',
            open: true, //启动服务,自动打开浏览器
            https: { //配置https证书
              key: key,
              cert: cert,
            },
            proxy: { // 代理配置
                //比如访问 http://localhost:3002/prod-api/3 其实就是访问 https://jsonplaceholder.typicode.com/todos/3
                "/prod-api": { // 代理接口前缀为/prod-api的请求
                    "target": isProduction ? 'https://jsonplaceholder.typicode.com/todos' : 'https://baidu.com', // 对应的代理地址
                    "secure": false, // 接受运行在https上,默认不接受
                    "changeOrigin": true, // 如果设置为true,那么本地会虚拟一个服务器接收你的请求并代你发送该请求,这样就不会有跨域问题(只适合开发环境)
                    rewrite: (p) => p.replace(/^\/prod-api/, ""), //重写路径 比如'/prod-api/aaa/ccc'重写为'/aaa/ccc'
                    bypass(req, res, options) { //专门查看请求的真实地址
                        const proxyURL = options.target + options.rewrite(req.url)
                        console.log('proxyURL', proxyURL)
                        req.headers['x-req-proxyURL'] = proxyURL // 设置未生效
                        res.setHeader('x-req-proxyURL', proxyURL) // 设置响应头可以看到
                    },
                },
            },

        },
    }
};遇到的问题汇总
vite.defineConfig报错
TypeError: vite.defineConfig is not a function
引入vite.config.js之后,启动项目报错 
vite的版本太低,升级版本即可
json
"vite": "^3.2.10"webstorm vue项目 @/xx/xx 相对路径不能跳转到对应文件
一般情况下,我们在路由文件中写的路径都是@/components/HelloWorld.vue 这种的形式,但是不会跳转就很气人,可以设置一下让可以跳转。
1.跟目录(与src同级)下创建jsconfig.json
2.jsconfig.json 配置内容
json
{
    "compilerOptions": {
        "types": [
            "@dcloudio/types"
        ],
        "baseUrl": ".",
        "paths": {
            "@/*": [
                "src/*"
            ]
        },
        "target": "ES6",
        "allowSyntheticDefaultImports": true
    },
    "include": [
        "src/**/*"
    ],
    "exclude": [
        "node_modules"
    ]
}无法处理VUE文件
[vite] Internal server error: Failed to parse source for import analysis because the content contains invalid JS syntax. Install @vitejs/plugin-vue to handle .vue files. 
依赖,主要下载 @vitejs/plugin-vue
json
{
    "dependencies": {
      "vue": "^3.0.4"
    },
    "devDependencies": {
      "@vitejs/plugin-vue": "^5.0.4",
      "vite": "^3.2.10"
    }
}vite.config.js
js
import { defineConfig } from "vite";
import vue from "@vitejs/plugin-vue";

export default defineConfig({
  plugins: [vue()],
});
